There’s a specific kind of frustration that comes from spending twenty minutes carefully brushing a mask around a rough stone wall, only to look at the result and know it’s still not quite right. The edge is off. The feathering is inconsistent. You’ve lost ten minutes you could have spent on the actual light work. I’ve been compositing long enough to have developed some patience for the tedious parts, but I’m also honest enough to admit when a tool exists that makes the tedious parts disappear. That’s what this is about.
In this Matt Kloskowski tutorial, he spotlights the Object Selection tool inside Lightroom Classic and Photoshop’s Camera Raw, a tool that quietly arrived alongside the much-louder Portrait Masking feature in the fall of 2022. Portrait Masking got all the attention, understandably. But Object Selection is the one I’ve worked into nearly every edit since I started using it properly. Watch the full tutorial on YouTube
The core idea is simple: instead of painting a mask by hand over a specific region, you give the tool a rough indication of what you’re after and let the AI figure out the edges. For composite work, where I’m constantly isolating environmental elements to match lighting across layers, this is not a minor convenience. It changes how fast I can move through a file.
Step 1: Access the Masking Panel in Lightroom or Camera Raw
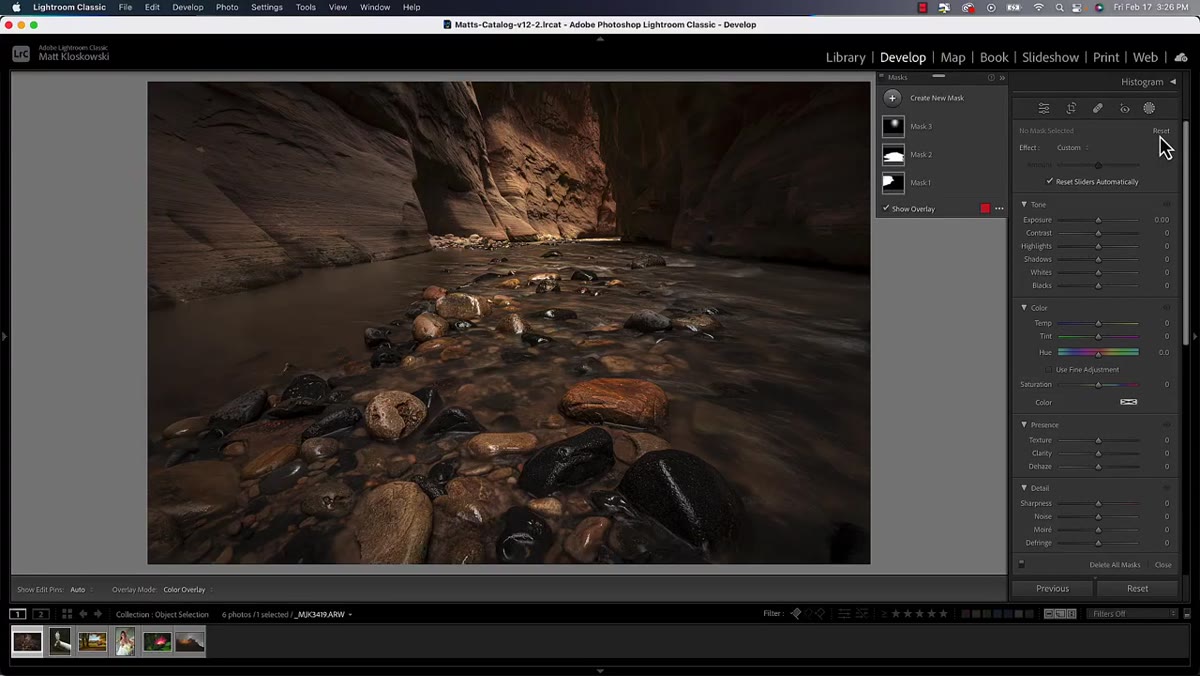 Masking tools panel open in Lightroom Classic
Open your image in Lightroom Classic, or if you’re working in Photoshop, open a raw file or use the Camera Raw filter under the Filter menu. Navigate to the Masking panel, which sits in the upper right of the interface. The workflow and the tool itself are identical across both applications, so wherever you spend most of your time, this applies directly.
Masking tools panel open in Lightroom Classic
Open your image in Lightroom Classic, or if you’re working in Photoshop, open a raw file or use the Camera Raw filter under the Filter menu. Navigate to the Masking panel, which sits in the upper right of the interface. The workflow and the tool itself are identical across both applications, so wherever you spend most of your time, this applies directly.
Once you’re in the masking panel, you’ll see the full list of available options: Select Subject, Sky, Background, People, Brush, Linear Gradient, and others. Object Selection lives in this same panel and is also accessible when you choose to add a new mask to an image that already has masks applied.
Step 2: Understand Where Object Selection Fits
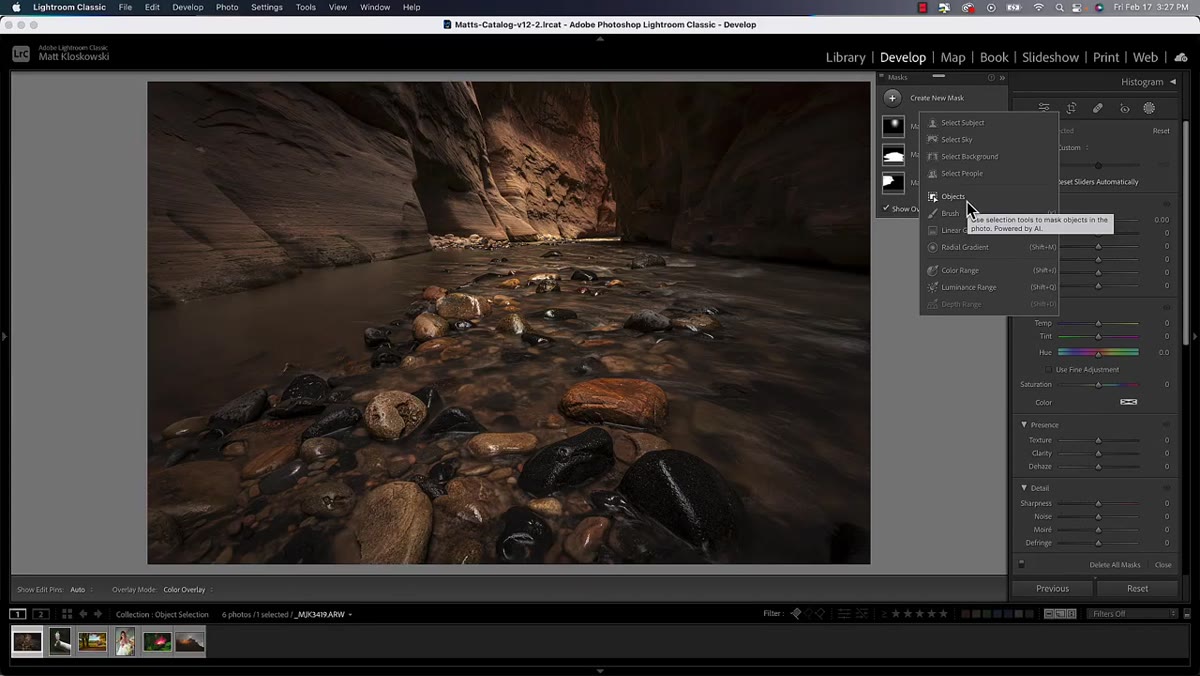 New mask menu showing all available masking options
Think of Object Selection as the option you reach for when the other automated tools are too broad. Select Subject grabs the main figure or dominant element in the frame. Sky and Background are self-explanatory. But what do you do when you want to isolate a specific wall, a single rock, a portion of a building, a patch of ground? None of those broad AI selections will give you that. The brush will, but only if you have time and patience to spare.
New mask menu showing all available masking options
Think of Object Selection as the option you reach for when the other automated tools are too broad. Select Subject grabs the main figure or dominant element in the frame. Sky and Background are self-explanatory. But what do you do when you want to isolate a specific wall, a single rock, a portion of a building, a patch of ground? None of those broad AI selections will give you that. The brush will, but only if you have time and patience to spare.
Object Selection fills the gap between “automated and approximate” and “manual and slow.” It uses AI to find precise edges, but you control exactly which object or region you point it at.
Step 3: Use the Brush Mode to Indicate Your Target Area
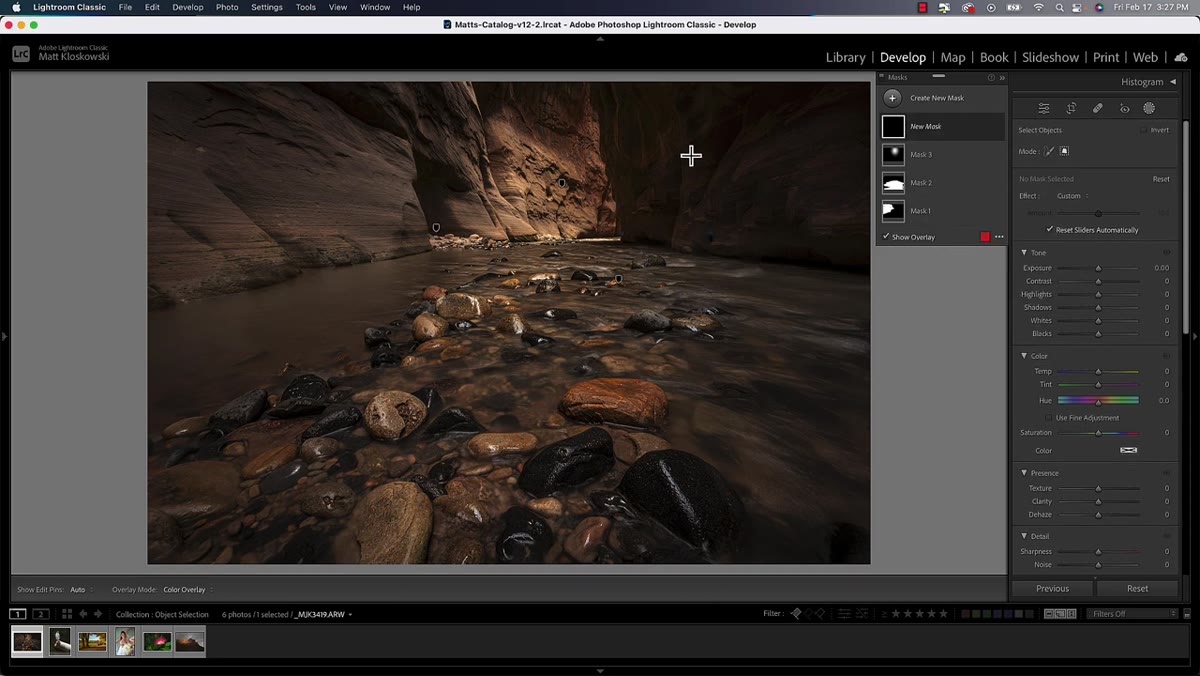 Brush being drawn loosely along a wall surface
When you select the Object Selection tool, you get two input modes. The first is a brush. Use the left and right bracket keys to size it up or down. The key thing Matt demonstrates here, and it matches my own experience, is that you do not need to be precise. You are not painting the mask itself. You are telling the tool what region to analyze.
Brush being drawn loosely along a wall surface
When you select the Object Selection tool, you get two input modes. The first is a brush. Use the left and right bracket keys to size it up or down. The key thing Matt demonstrates here, and it matches my own experience, is that you do not need to be precise. You are not painting the mask itself. You are telling the tool what region to analyze.
Draw loosely along and through the area you want isolated. If it’s a wall, drag the brush across the wall’s surface and along its edges without worrying about staying inside the lines. The AI reads your gesture as intent, then calculates the actual boundary. Fill in the rough center of the area as well, since on some images that extra coverage helps the algorithm commit to the right selection.
Step 4: Use the Lasso (Rectangular) Mode for Defined Objects
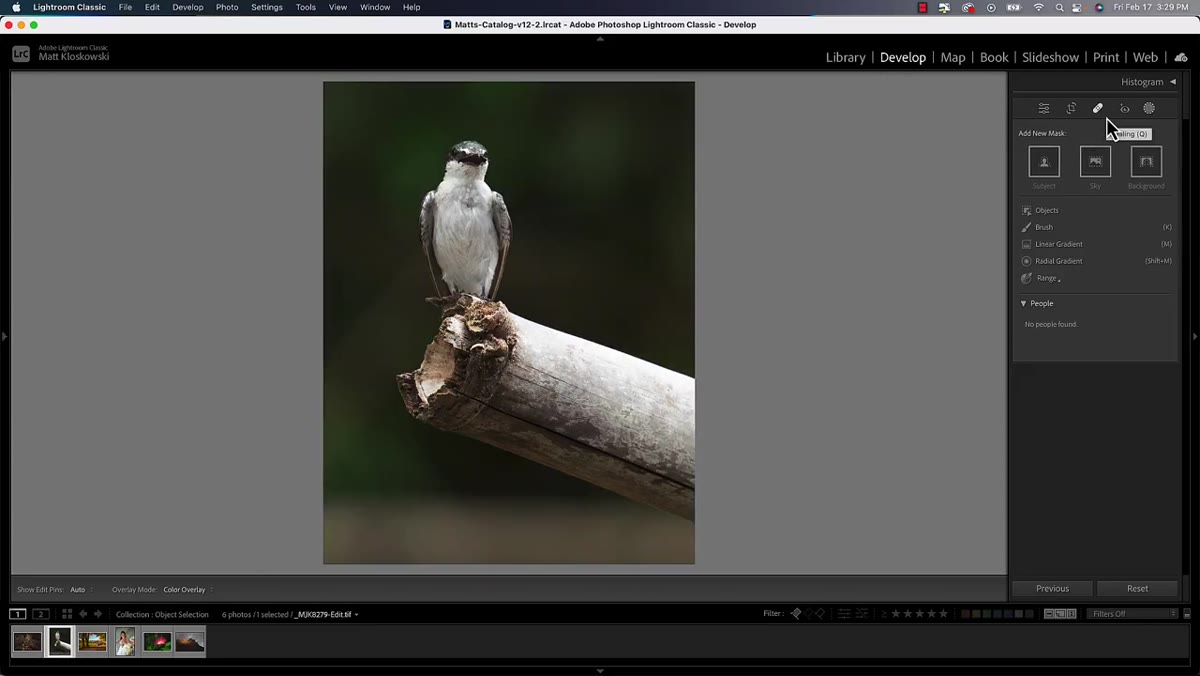 Rectangular lasso being drawn around a subject in a new photo
The second input mode is a rectangular selection, which works more like a lasso. Instead of painting, you click and drag a box around the object you want selected. This is the faster move when your target has a relatively clear boundary, like a person, a tree, a vehicle, or any element with some separation from its background.
Rectangular lasso being drawn around a subject in a new photo
The second input mode is a rectangular selection, which works more like a lasso. Instead of painting, you click and drag a box around the object you want selected. This is the faster move when your target has a relatively clear boundary, like a person, a tree, a vehicle, or any element with some separation from its background.
Draw the rectangle loosely around the object. It does not need to hug the edges tightly. The tool looks inside that boundary, identifies the dominant object, and builds a clean mask around it. For isolated subjects especially, this mode is remarkably accurate on the first pass.
Step 5: Refine with Subtract and Feathering
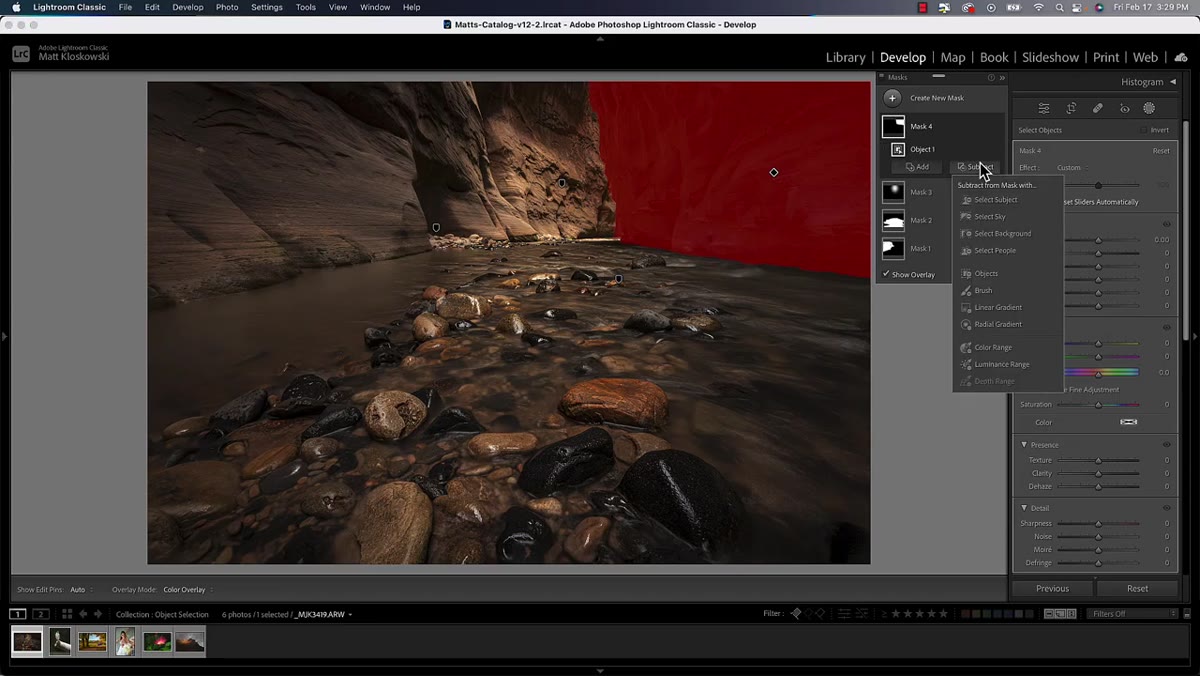 Subtract brush with feather at 100 softening mask edge
No AI selection is perfect on every image, and the Object Selection tool is no exception. At the bottom of irregular shapes or anywhere the boundary is ambiguous, you’ll likely have some overshoot. From the mask’s options, choose Subtract, then pick the Brush tool. Set the feather value to 100. Use that softened brush to gently roll back the edges that aren’t reading correctly.
Subtract brush with feather at 100 softening mask edge
No AI selection is perfect on every image, and the Object Selection tool is no exception. At the bottom of irregular shapes or anywhere the boundary is ambiguous, you’ll likely have some overshoot. From the mask’s options, choose Subtract, then pick the Brush tool. Set the feather value to 100. Use that softened brush to gently roll back the edges that aren’t reading correctly.
This is not a heavy correction step. You’re blending the mask edge, not repainting it. A few strokes with a large, fully feathered brush along the bottom or transitional edge of the mask will make it integrate naturally, especially when you’re applying exposure or color adjustments that need to fade out rather than cut off.
Step 6: Apply Your Adjustment and Evaluate
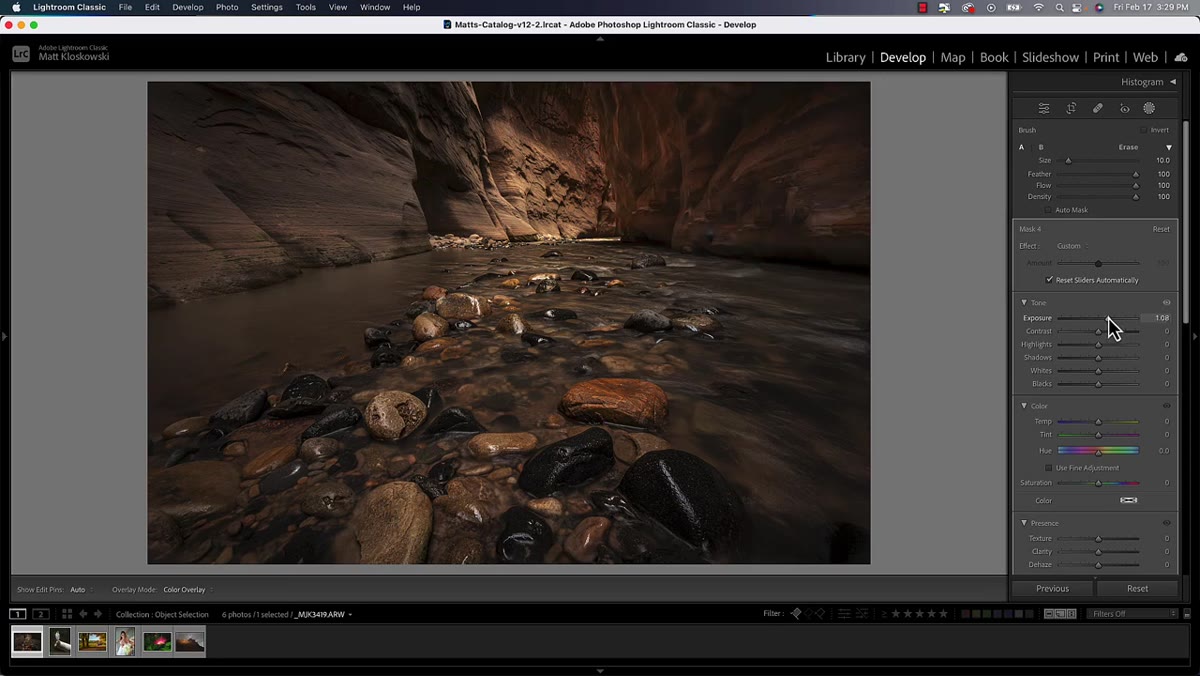 Exposure and warmth sliders adjusted on the isolated wall mask
Once the mask looks solid, move to whatever adjustment you came here to make. Exposure, white balance, contrast, dehaze, any of the panel sliders now apply only to your isolated region. Matt demonstrates brightening a wall and adding warmth, and the point lands clearly: what used to require careful, time-consuming hand-brushing now takes about thirty seconds of rough gesturing.
Exposure and warmth sliders adjusted on the isolated wall mask
Once the mask looks solid, move to whatever adjustment you came here to make. Exposure, white balance, contrast, dehaze, any of the panel sliders now apply only to your isolated region. Matt demonstrates brightening a wall and adding warmth, and the point lands clearly: what used to require careful, time-consuming hand-brushing now takes about thirty seconds of rough gesturing.
Check the result at 100% zoom, particularly around the edges. If you need a second pass, add another Object Selection mask targeting a slightly different area and combine them, or use the Add option to extend the existing mask into any gaps.
How I Use This Differently in Composite Work
The Object Selection tool was built with photography and local adjustments in mind, but in compositing it earns its keep during the matching phase. When I bring a background plate into a scene, I often need to selectively warm or cool specific environmental elements, a rock face, a patch of sky that’s too saturated, a stretch of ground that reads too light compared to my subject. Previously I was masking those regions by hand, which meant fifteen minutes of work before I even got to the real problem.
Now I use Object Selection to isolate those zones quickly, apply a rough correction, and spend my actual time on the light relationship between the subject and the environment. One thing worth noting: the tool works inside Camera Raw as a filter in Photoshop, which means you can apply it non-destructively on a Smart Object. That matters for compositing, where you don’t want to flatten anything you might need to revisit later.
The single most useful thing this tool does is remove the excuse of “that would take too long to mask.” Most of the time, it won’t. Rough brush strokes or a loose rectangle is all it needs. The AI handles the actual edge work, and you refine with a feathered subtract brush if anything needs cleaning up. That’s the whole process.
Watch the full tutorial on YouTube to see Matt walk through multiple examples, including how the tool handles rocks and natural textures where you’d least expect it to succeed.
Comments (2)
Shared this with my photography group. Everyone loved it.
My workflow just got 10x faster. Not even kidding.
Leave a Comment