There is a particular kind of frustration that every retoucher knows. You paint a careful adjustment over a sky or a patch of bright water, and when you pull back to look at the full frame, you’ve accidentally dragged that adjustment onto areas you never wanted to touch. The dark foreground rocks go muddy. The shadows under a subject’s chin get crushed. You either spend twenty minutes cleaning up the edges with an eraser brush, or you accept an imprecise result and move on. Neither option feels good.
I spent six months deep in the behavior of light on water for a single album cover project, and that experience made me ruthless about precision in masking. Sloppy selections ruin composites the same way a bad light source direction does. So when I came across a Matt Kloskowski tutorial walking through real-world applications of Lightroom’s Range Mask slider, it addressed a problem I run into constantly when I’m doing prep work on raw files before they come into Photoshop. The technique is elegant and faster than anything you’d do manually. Watch the full tutorial on YouTube if you want to follow along with the source footage.
The core idea is this: Lightroom lets you paint a local adjustment brush over a region of the image, and then the Range Mask lets you restrict where that adjustment actually applies based on luminance values. You paint loosely, and then you let the math clean it up. Here is how it works in practice.
Step 1: Identify the Exposure Problem and Make a Broad Brush Adjustment
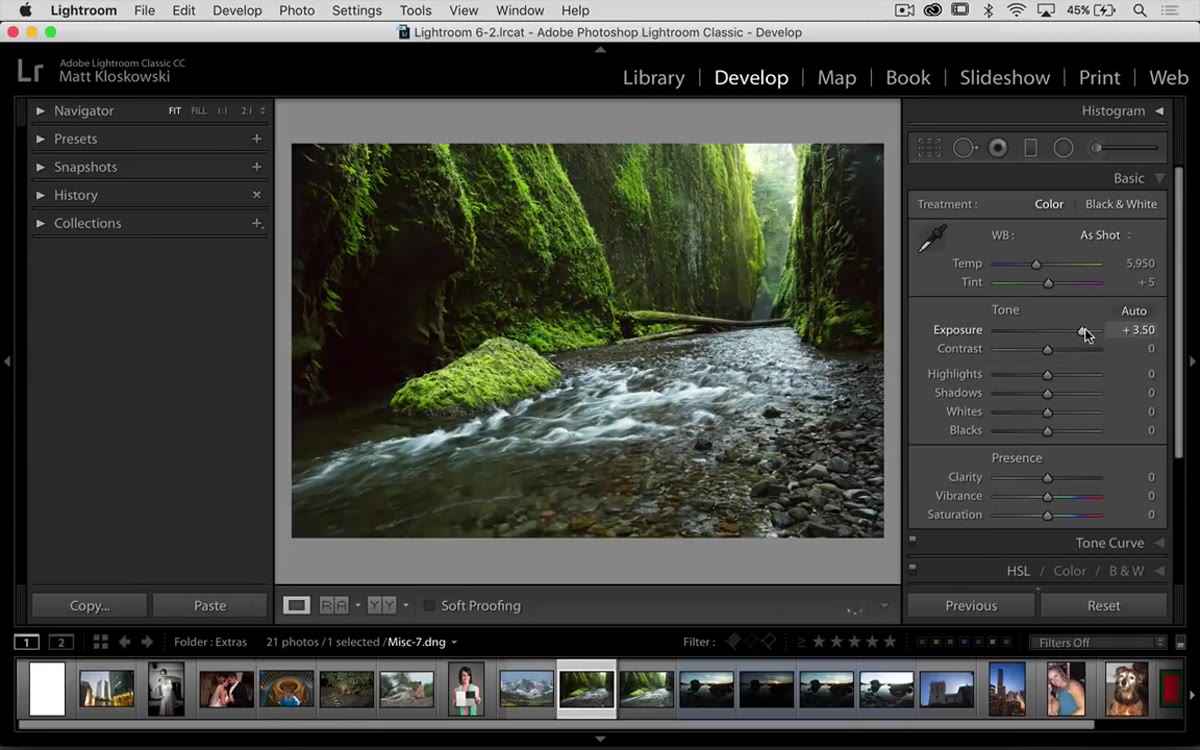 Exposure slider pushed up, background sky going bright
Start with an image that has uneven exposure, a dark foreground with a brighter background being a classic example. Select the Adjustment Brush and push the exposure up enough to lift the shadows in the foreground to where you want them. At this stage, expect the bright areas of the image to blow out or go very hot. That is fine. You are not trying to be precise yet. Paint over the general area you want to affect, including some of the brighter zones you don’t actually want to touch.
Exposure slider pushed up, background sky going bright
Start with an image that has uneven exposure, a dark foreground with a brighter background being a classic example. Select the Adjustment Brush and push the exposure up enough to lift the shadows in the foreground to where you want them. At this stage, expect the bright areas of the image to blow out or go very hot. That is fine. You are not trying to be precise yet. Paint over the general area you want to affect, including some of the brighter zones you don’t actually want to touch.
Step 2: Add a Second Brush Pass to Pull Back the Bright Regions
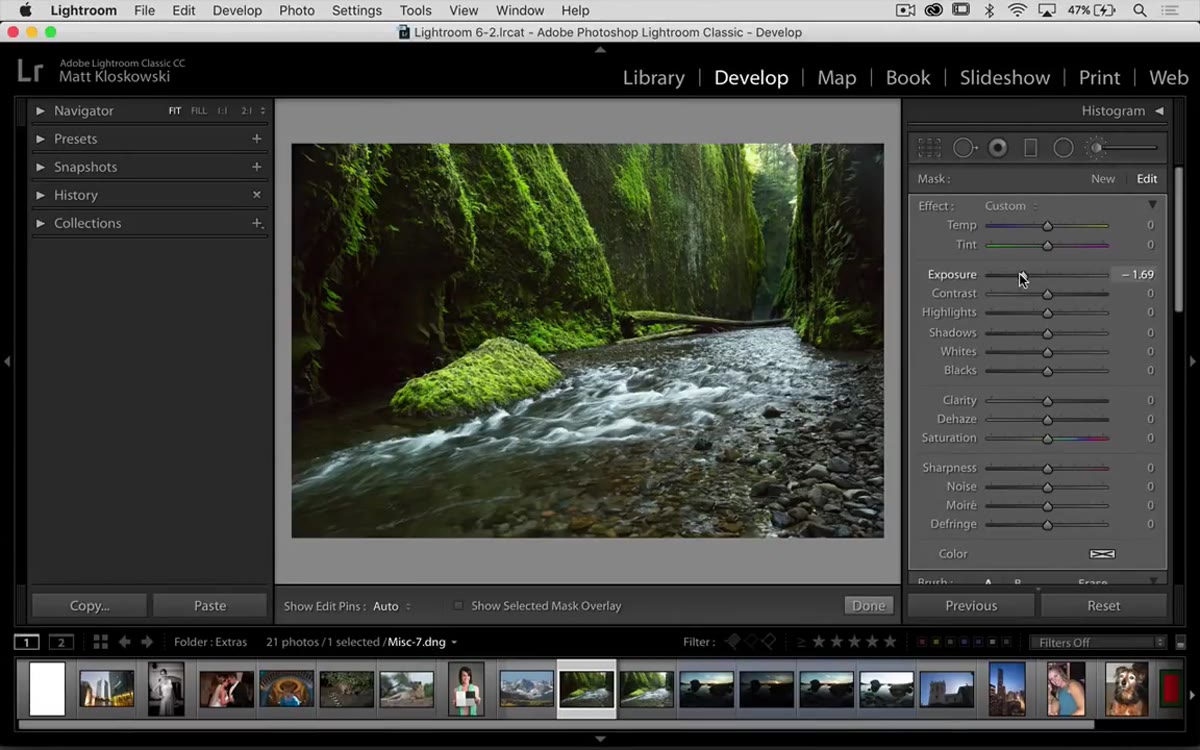 Brush painted haphazardly over bright water and sky area
Click “New” to create a second local adjustment on top of the first, or work within the same mask if the intent is to counteract the overexposed areas. Bring the exposure down on this second pass and reduce the highlights slider to recover texture in those brighter zones. Paint loosely over the bright areas, which in the tutorial means a reflective water surface or a bright sky. The painting will almost certainly bleed into darker tones you want to leave alone, which is exactly why the next step exists.
Brush painted haphazardly over bright water and sky area
Click “New” to create a second local adjustment on top of the first, or work within the same mask if the intent is to counteract the overexposed areas. Bring the exposure down on this second pass and reduce the highlights slider to recover texture in those brighter zones. Paint loosely over the bright areas, which in the tutorial means a reflective water surface or a bright sky. The painting will almost certainly bleed into darker tones you want to leave alone, which is exactly why the next step exists.
Step 3: Open the Range Mask Panel and Switch to Luminance
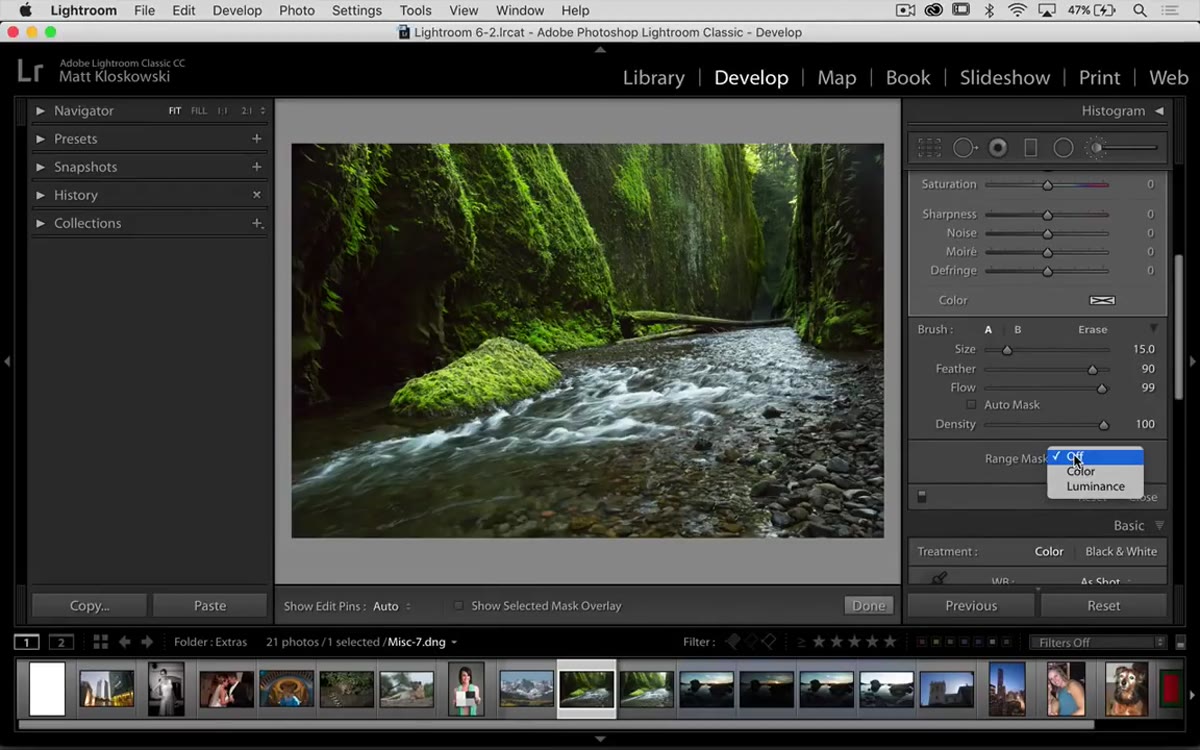 Range Mask dropdown set to Luminance in the panel
At the bottom of the Adjustment Brush panel, you will find the Range Mask dropdown. It defaults to “None.” Open it and select “Luminance.” This tells Lightroom to evaluate the tonal value of every pixel you painted over and use that information to decide how much of the adjustment to apply. You are no longer working with a hard painted edge. You are working with the image’s own tonal structure as your guide.
Range Mask dropdown set to Luminance in the panel
At the bottom of the Adjustment Brush panel, you will find the Range Mask dropdown. It defaults to “None.” Open it and select “Luminance.” This tells Lightroom to evaluate the tonal value of every pixel you painted over and use that information to decide how much of the adjustment to apply. You are no longer working with a hard painted edge. You are working with the image’s own tonal structure as your guide.
Step 4: Drag the Luminance Range Slider to Target Only the Bright Tones
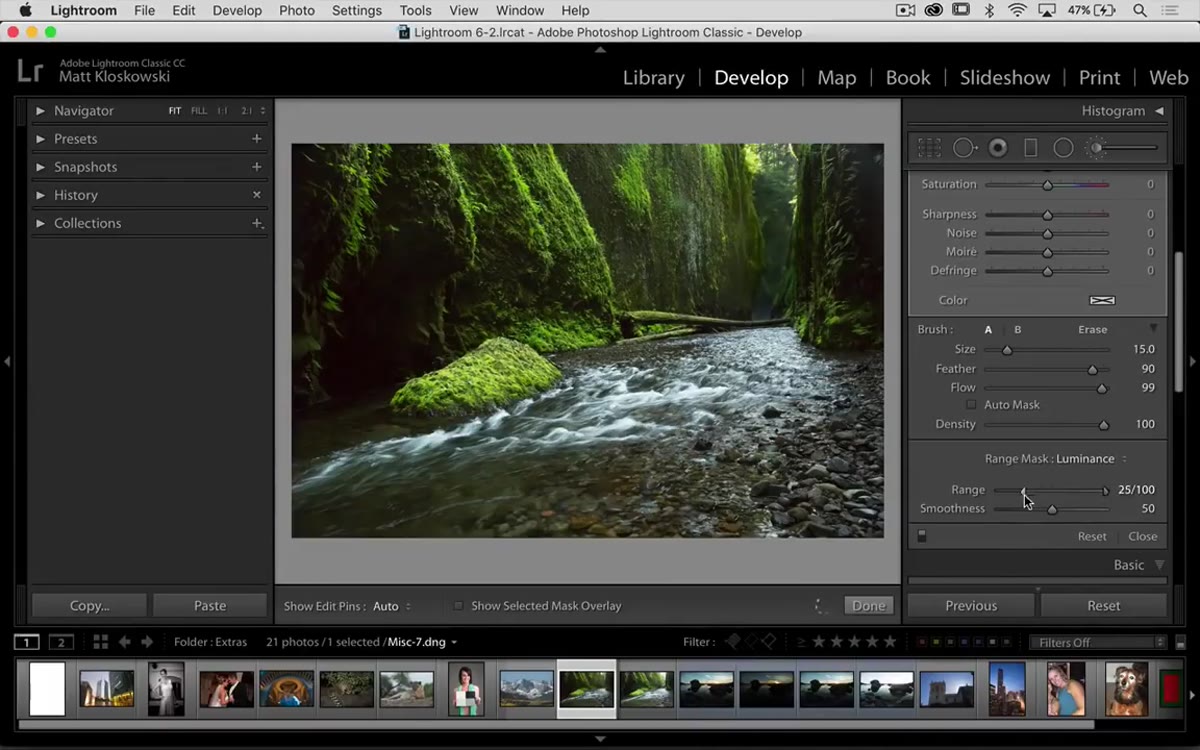 Left handle of Luminance Range slider being dragged right
The Luminance Range slider shows a gradient from dark on the left to light on the right. Drag the left handle toward the right. As you move it, Lightroom begins restricting the adjustment so it only applies to pixels above a certain brightness threshold. Watch a specific midtone area of the image as you drag: you will see it transition from affected to unaffected in real time. The goal is to isolate only the genuinely bright tones, the highlights and bright midtones in the water or sky, while leaving the darker foreground elements untouched even though your brush passed over them.
Left handle of Luminance Range slider being dragged right
The Luminance Range slider shows a gradient from dark on the left to light on the right. Drag the left handle toward the right. As you move it, Lightroom begins restricting the adjustment so it only applies to pixels above a certain brightness threshold. Watch a specific midtone area of the image as you drag: you will see it transition from affected to unaffected in real time. The goal is to isolate only the genuinely bright tones, the highlights and bright midtones in the water or sky, while leaving the darker foreground elements untouched even though your brush passed over them.
Avoid pulling the right handle inward unless you specifically want to exclude the very brightest tones. In most cases, pulling only the left handle rightward is enough to do the work.
Step 5: Adjust the Smoothness Slider to Control the Transition Edge
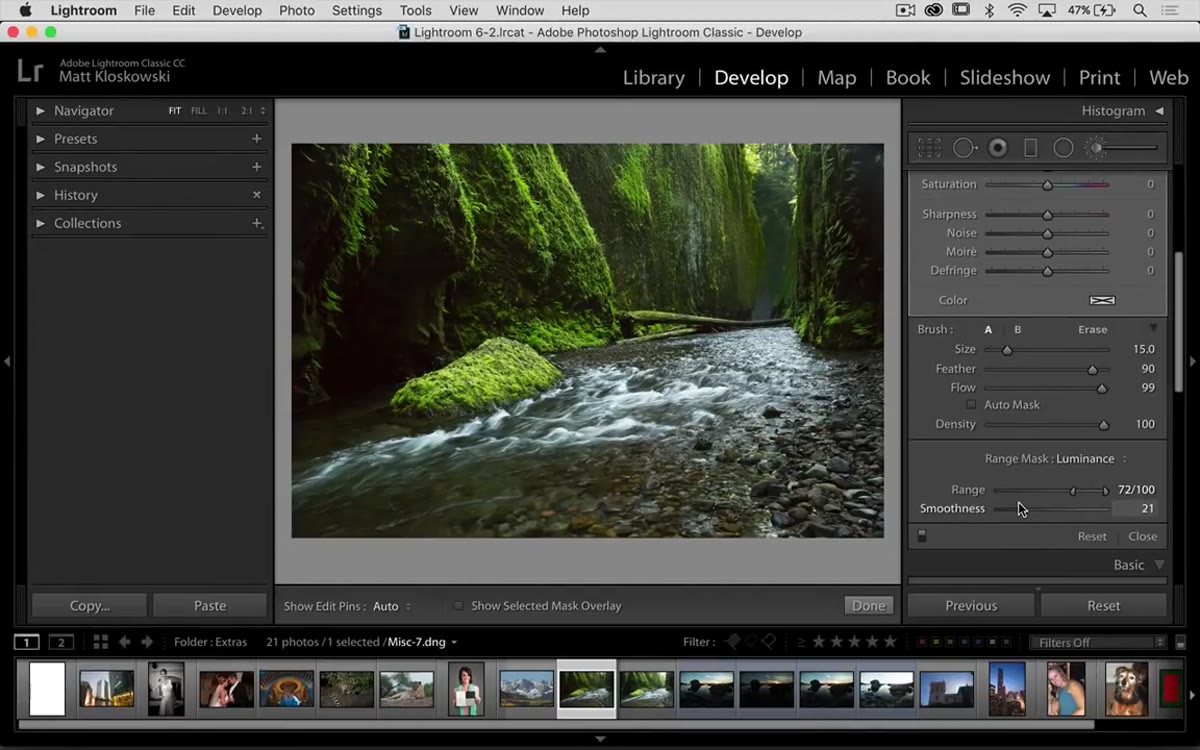 Smoothness slider being adjusted below the Range slider
Directly below the Luminance Range bar is a Smoothness slider. This controls how hard or soft the transition is between pixels that receive the adjustment and those that don’t. Too far left and you get a harsh, posterized edge that looks unnatural. Too far right and the mask bleeds softly back into tones you were trying to exclude. Find the middle ground by toggling the adjustment on and off with the panel’s switch while watching the transition area in the image. The right smoothness value will be different for every image depending on how much contrast exists between the zones you’re separating.
Smoothness slider being adjusted below the Range slider
Directly below the Luminance Range bar is a Smoothness slider. This controls how hard or soft the transition is between pixels that receive the adjustment and those that don’t. Too far left and you get a harsh, posterized edge that looks unnatural. Too far right and the mask bleeds softly back into tones you were trying to exclude. Find the middle ground by toggling the adjustment on and off with the panel’s switch while watching the transition area in the image. The right smoothness value will be different for every image depending on how much contrast exists between the zones you’re separating.
Step 6: Use the Toggle and Optional Erase Pass to Evaluate and Clean Up
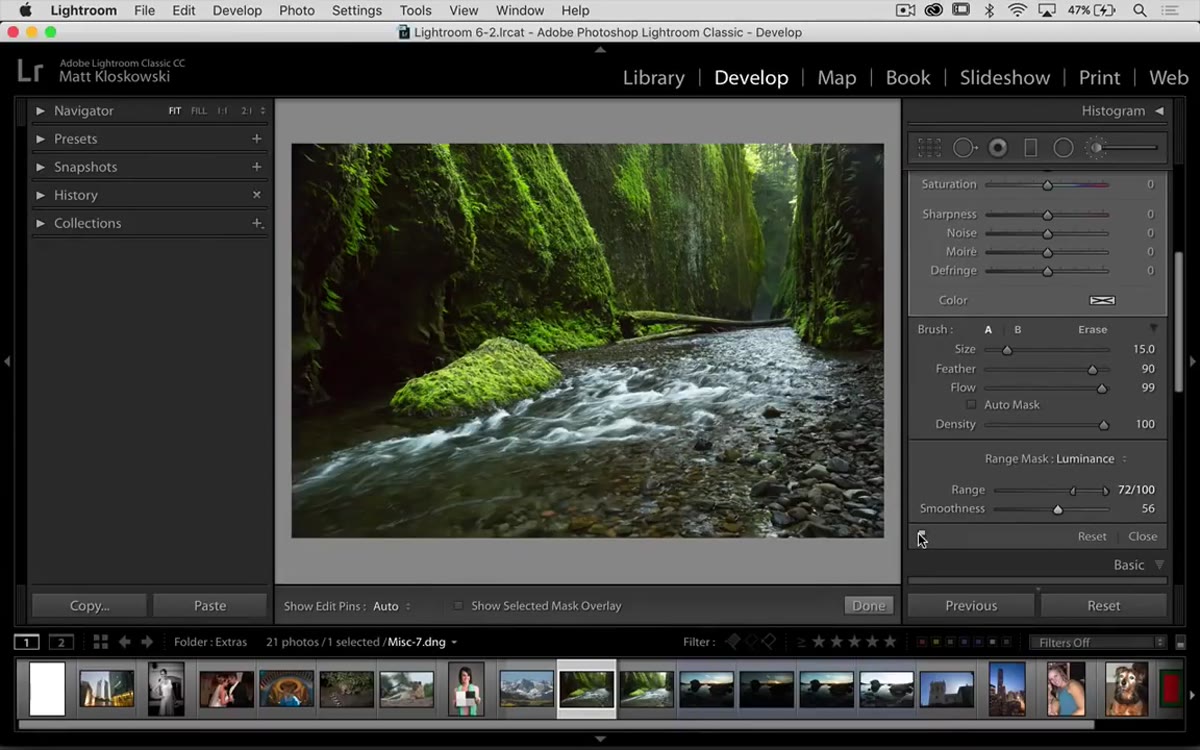 Before and after toggle comparing masked and unmasked adjustment
Toggle the local adjustment on and off to compare the before and after state. If the Range Mask has done its job correctly, the adjustment will appear only in the intended tonal zone, with little or no bleed into the darker areas. At this point, if there are any small areas still looking off, hold Option on Mac or Alt on Windows to switch the brush temporarily to Erase mode, and clean up manually. In most cases, the Range Mask has already done enough that this erasing step takes less than thirty seconds rather than several minutes.
Before and after toggle comparing masked and unmasked adjustment
Toggle the local adjustment on and off to compare the before and after state. If the Range Mask has done its job correctly, the adjustment will appear only in the intended tonal zone, with little or no bleed into the darker areas. At this point, if there are any small areas still looking off, hold Option on Mac or Alt on Windows to switch the brush temporarily to Erase mode, and clean up manually. In most cases, the Range Mask has already done enough that this erasing step takes less than thirty seconds rather than several minutes.
What This Looks Like in a Compositing Workflow
I do most of my fine masking in Photoshop, but the work that happens in Lightroom before an image ever reaches my canvas matters more than most people give it credit for. When I’m prepping a landscape plate for a composite, tonal inconsistencies in the sky or the water surface create problems later during color grading and light matching. The Range Mask handles a lot of that cleanup at the raw stage, which means I’m bringing a cleaner file into Photoshop to begin with.
One thing I’d add beyond what the tutorial covers: the Range Mask becomes especially powerful when you’re working with portraits and trying to control where a skin-smoothing or dodging brush affects the face. The difference in luminance between a highlight on the cheekbone and a shadow under the jaw is usually enough for Lightroom to isolate the adjustment cleanly. Same principle, different subject.
The single most important thing to take away from this technique is that precision in masking does not always require precision in painting. Lightroom can use the pixel data that’s already in your image to do the separating for you, as long as there is enough tonal contrast between the zones you’re trying to affect and those you’re trying to protect. Paint broadly, then let the luminance range do the fine work.
Watch the full tutorial on YouTube to see Matt walk through both the landscape and portrait examples with the actual source files.
Comments (2)
Applied this to my portfolio shots and the improvement is noticeable.
Would love to see a follow-up going deeper into this topic.
Leave a Comment