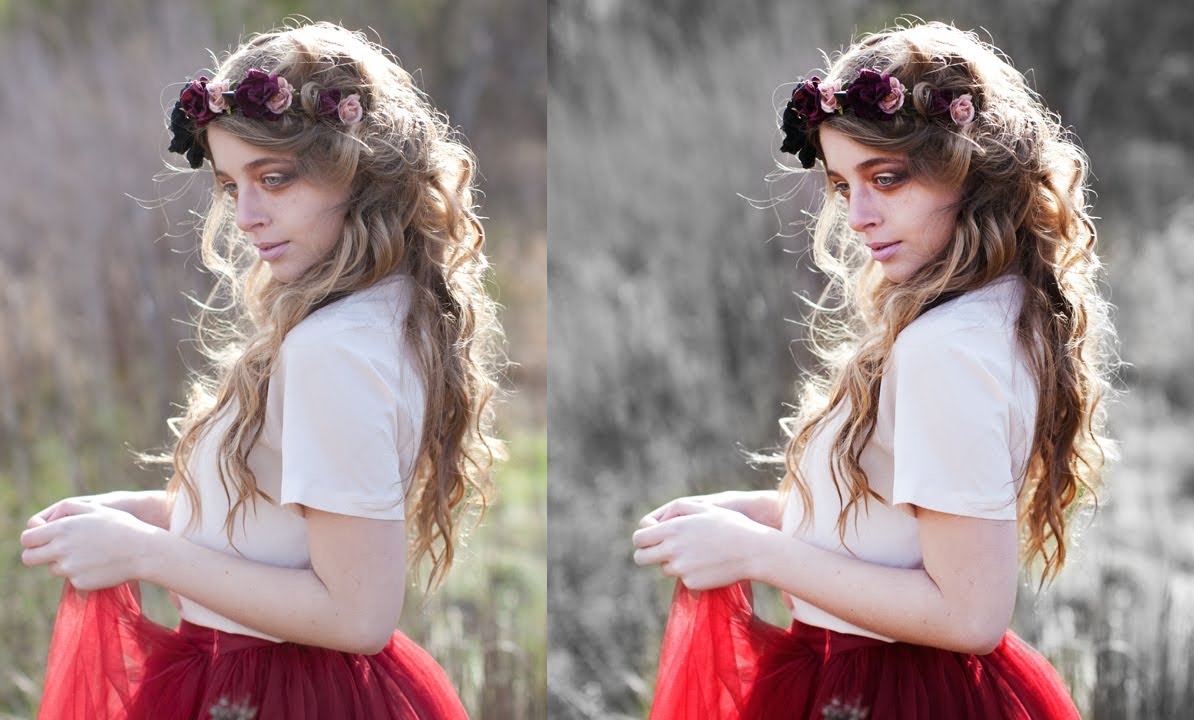
Early in my career, I made a composite for a small book cover project that I thought was clean. The shadow fell wrong, the direction inconsistent with the key light source, and I shipped it anyway because I didn’t have a non-destructive way to go back and fix individual elements without unraveling the whole file. That’s the cost of not understanding masks. Every edit I made was baked in, permanent, a decision I couldn’t revisit without starting over. That single limitation cost me hours I didn’t have.
Layer masks are the answer to that problem, and they’re the kind of tool that feels unnecessarily intimidating until the moment they click. Watch the full tutorial on YouTube from photographer and educator Jessica Kobeissi, who walks through the concept with a clarity I genuinely wished I’d had when I was starting out. What she demonstrates in this tutorial is not a trick or a shortcut. It’s a foundational way of thinking about how Photoshop layers work and how you control visibility without permanently erasing anything.
The central insight is this: a mask doesn’t delete pixels. It hides them. White reveals, black conceals, and every gray value in between is a degree of transparency. Once that logic lands, the entire Photoshop layer panel starts to make a different kind of sense. Here’s how Kobeissi builds that understanding step by step.
Step 1: Understand What a Mask Actually Is
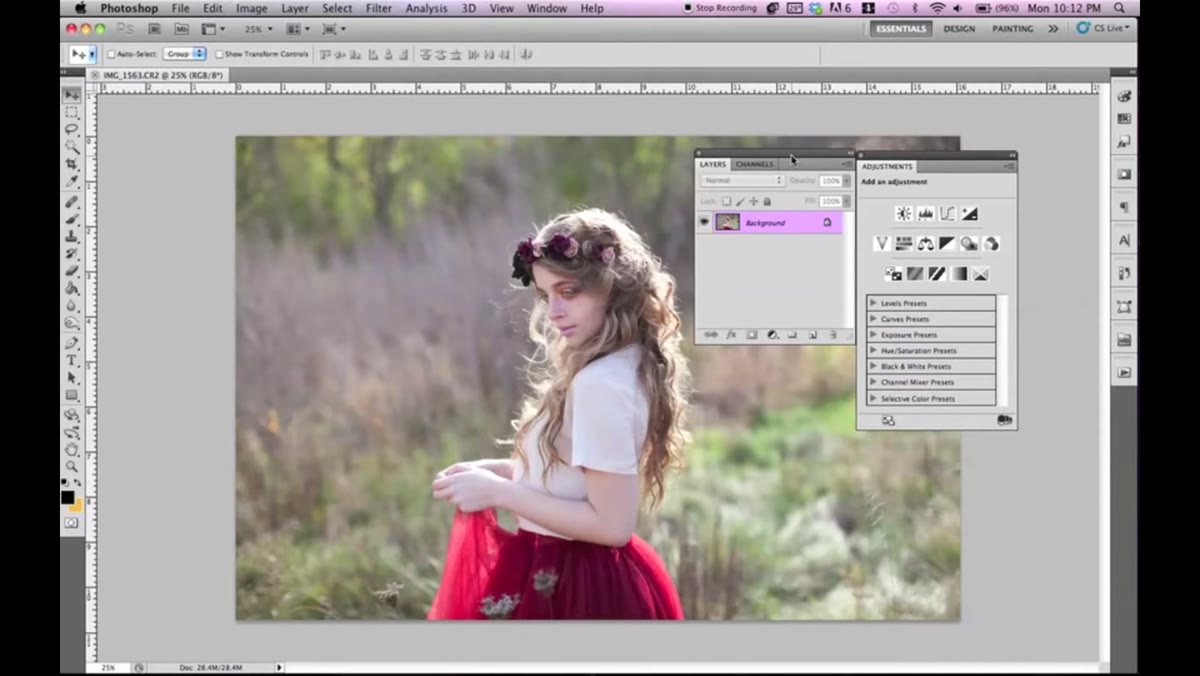 Kobeissi explaining the concept of masking with simple analogy
Before touching a single tool, Kobeissi grounds the concept in something physical: a mask covers certain parts and reveals others. It’s worth sitting with that framing before you open Photoshop, because the tool behaves exactly like the metaphor. In the layers panel, a mask appears as a thumbnail attached to its layer, either white (fully visible), black (fully hidden), or a mix. The layer’s pixel data never changes. Only what you see changes.
Kobeissi explaining the concept of masking with simple analogy
Before touching a single tool, Kobeissi grounds the concept in something physical: a mask covers certain parts and reveals others. It’s worth sitting with that framing before you open Photoshop, because the tool behaves exactly like the metaphor. In the layers panel, a mask appears as a thumbnail attached to its layer, either white (fully visible), black (fully hidden), or a mix. The layer’s pixel data never changes. Only what you see changes.
Step 2: Create a Solid Color Fill Layer and Set the Blend Mode
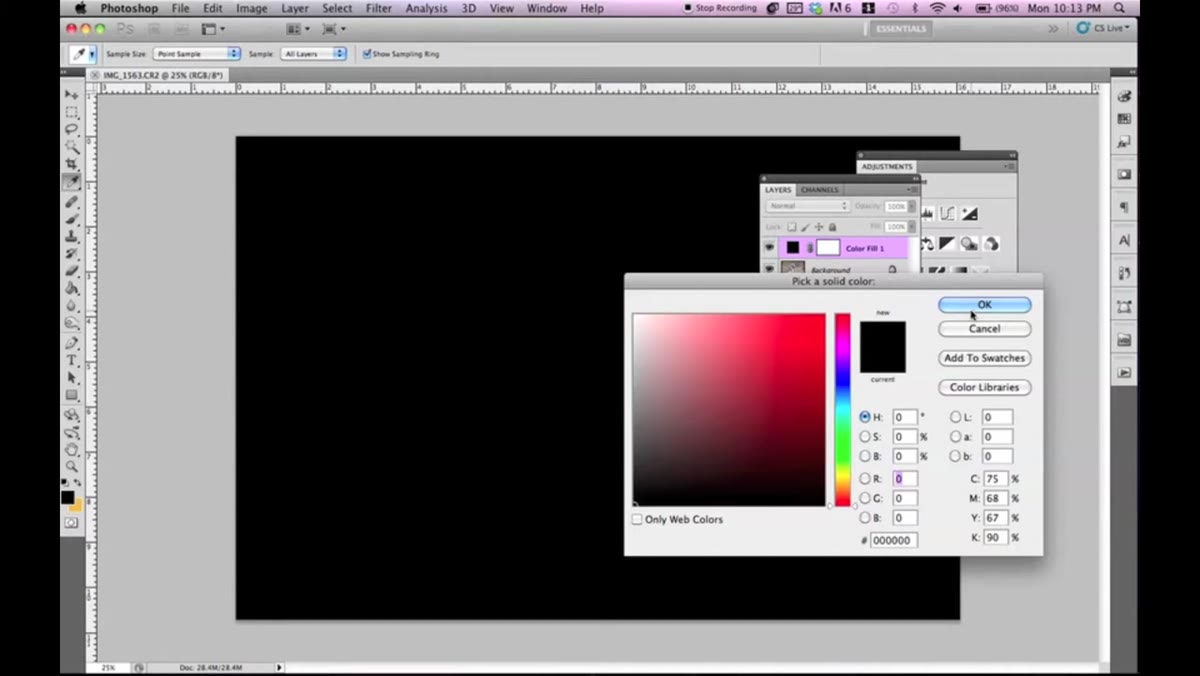 Solid color fill layer added, set to Color blend mode
Kobeissi starts with a practical, popular effect: converting a photo to black and white while keeping one element in full color. To do this, she adds a Solid Color fill layer and sets the color to black. Then she changes the layer’s blend mode to Color. That blend mode is the key here. It strips the hue and saturation information from everything beneath it, leaving only luminosity values, which reads visually as black and white. The mask on this layer, which is white by default when you create it, means the effect applies to the entire image.
Solid color fill layer added, set to Color blend mode
Kobeissi starts with a practical, popular effect: converting a photo to black and white while keeping one element in full color. To do this, she adds a Solid Color fill layer and sets the color to black. Then she changes the layer’s blend mode to Color. That blend mode is the key here. It strips the hue and saturation information from everything beneath it, leaving only luminosity values, which reads visually as black and white. The mask on this layer, which is white by default when you create it, means the effect applies to the entire image.
Step 3: Select the Layer Mask Thumbnail, Not the Layer Itself
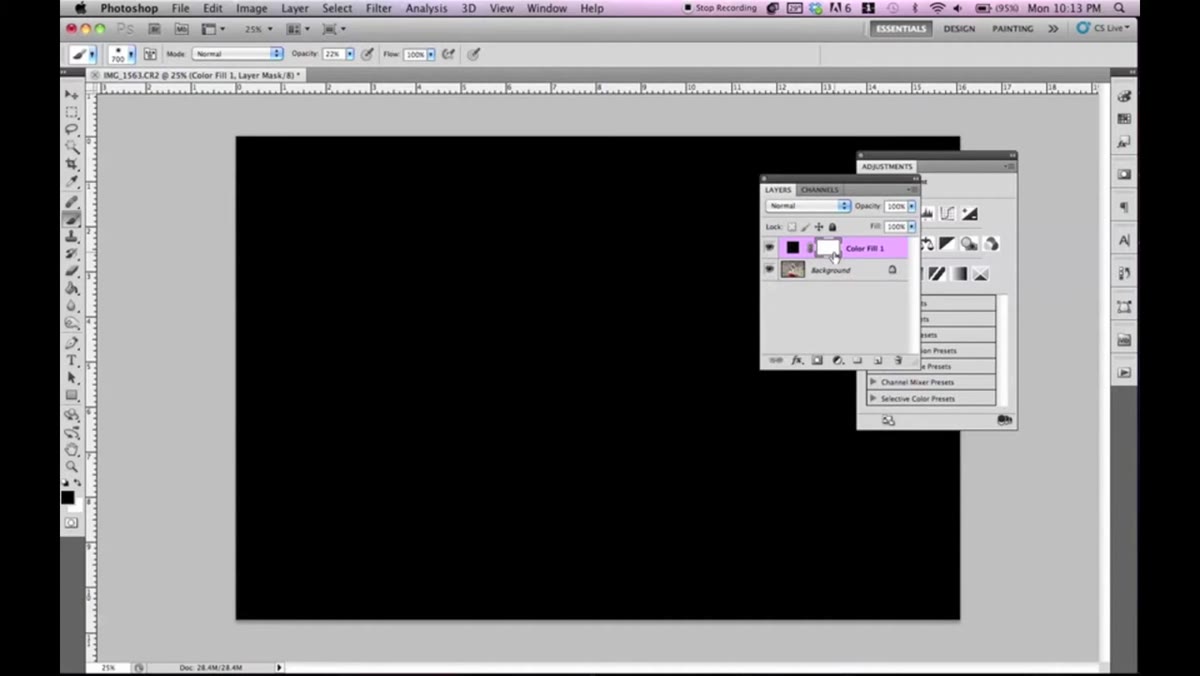 Layer mask thumbnail highlighted in Layers panel
This is where a lot of beginners get stuck, and Kobeissi calls it out directly. When you have a fill or adjustment layer, there are two thumbnails in the layers panel: the layer content and the mask. Clicking the wrong one means your brush strokes go nowhere useful. You need to click the white mask thumbnail specifically. When selected, it gets a highlight border around it. Once that’s active, any painting you do with black or white affects the mask, not the layer content.
Layer mask thumbnail highlighted in Layers panel
This is where a lot of beginners get stuck, and Kobeissi calls it out directly. When you have a fill or adjustment layer, there are two thumbnails in the layers panel: the layer content and the mask. Clicking the wrong one means your brush strokes go nowhere useful. You need to click the white mask thumbnail specifically. When selected, it gets a highlight border around it. Once that’s active, any painting you do with black or white affects the mask, not the layer content.
Step 4: Paint with Black to Reveal the Original Color
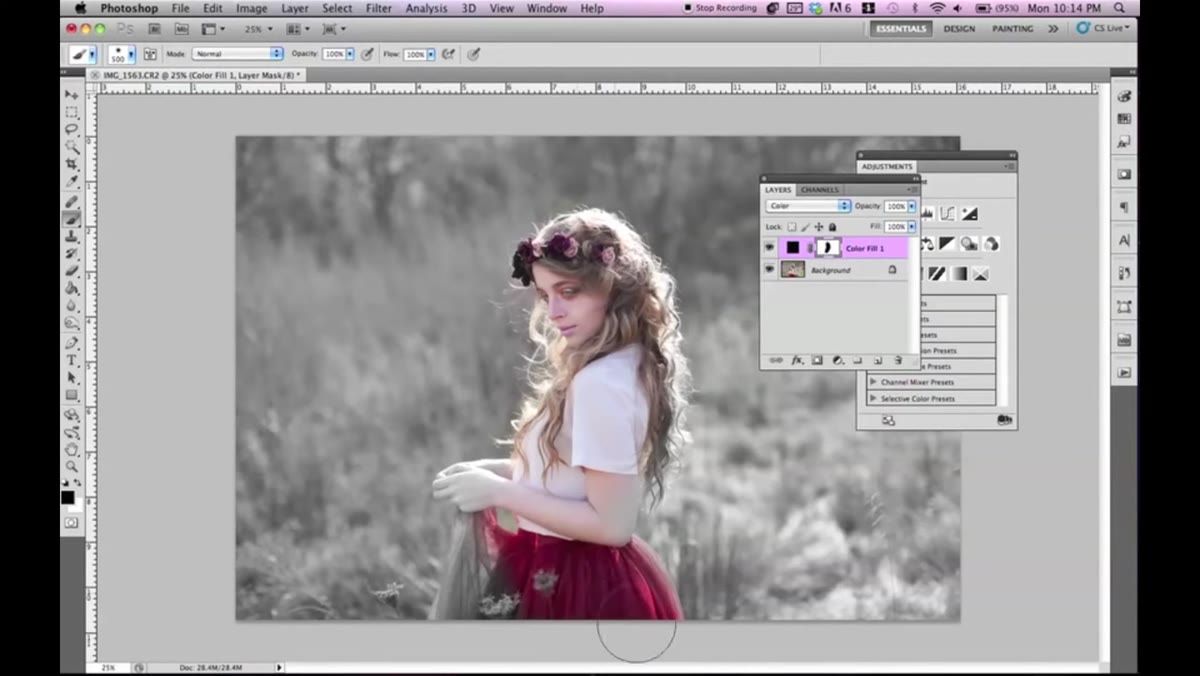 Brush painting black onto mask, restoring color to subject
With the mask selected, set your foreground color to black and your brush opacity to 100 percent. Paint directly over the area of the image you want to restore to color. Because black hides the fill layer in those regions, the original photo underneath shows through, which means full color returns exactly where you paint. Use a soft brush for organic subjects like hair or skin, and a harder edge for well-defined shapes. The size and hardness of the brush determine how smooth or sharp the transition between color and black and white will be.
Brush painting black onto mask, restoring color to subject
With the mask selected, set your foreground color to black and your brush opacity to 100 percent. Paint directly over the area of the image you want to restore to color. Because black hides the fill layer in those regions, the original photo underneath shows through, which means full color returns exactly where you paint. Use a soft brush for organic subjects like hair or skin, and a harder edge for well-defined shapes. The size and hardness of the brush determine how smooth or sharp the transition between color and black and white will be.
Step 5: Switch Colors to Correct Mistakes
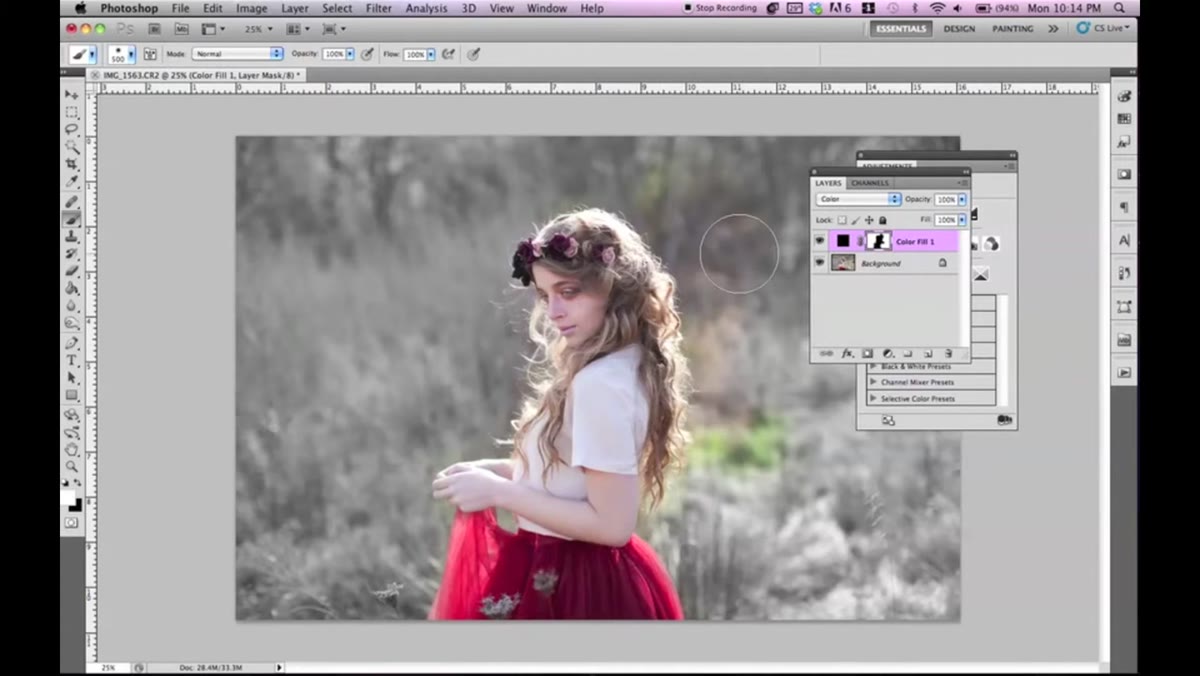 Pressing X to switch foreground color, correcting over-painted area
One of the most useful shortcuts Kobeissi highlights is pressing X on the keyboard to swap the foreground and background colors. If you paint too far and accidentally restore color to an area that should stay black and white, switch to white and paint back over that area. White reapplies the fill layer effect. This is the non-destructive advantage in practice: you’re not undoing history or erasing pixels. You’re just correcting the mask, which you can do indefinitely without degrading the image.
Pressing X to switch foreground color, correcting over-painted area
One of the most useful shortcuts Kobeissi highlights is pressing X on the keyboard to swap the foreground and background colors. If you paint too far and accidentally restore color to an area that should stay black and white, switch to white and paint back over that area. White reapplies the fill layer effect. This is the non-destructive advantage in practice: you’re not undoing history or erasing pixels. You’re just correcting the mask, which you can do indefinitely without degrading the image.
Step 6: Alt-Click the Mask to Inspect It
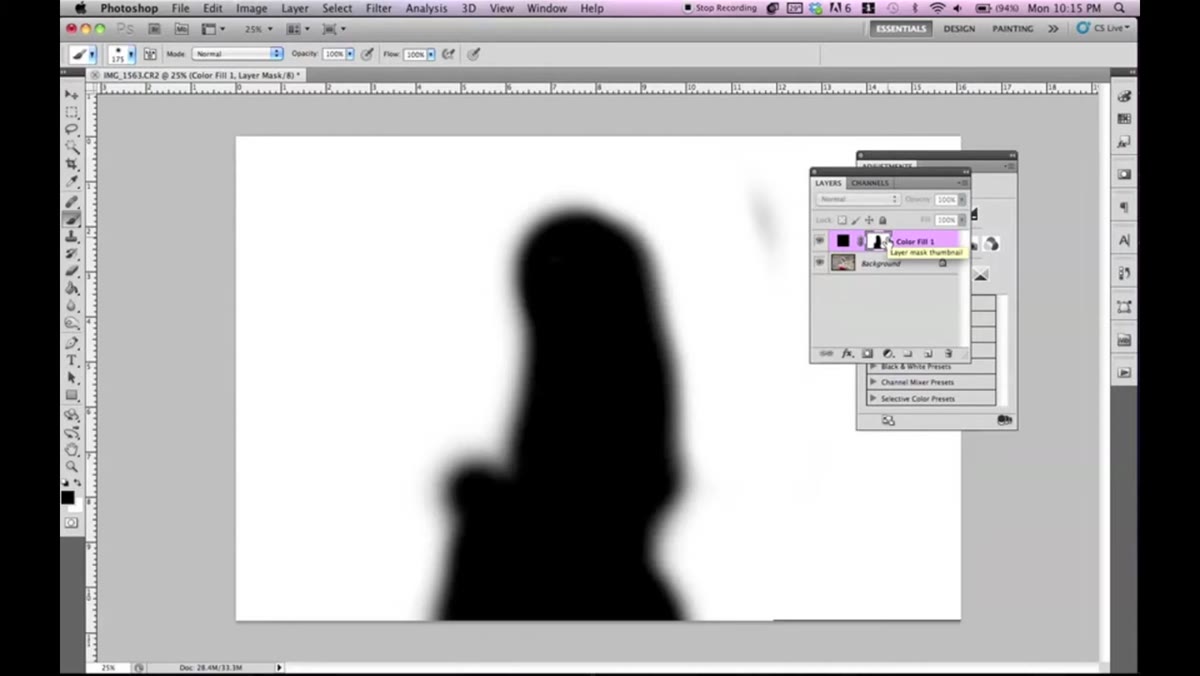 Alt-click on mask thumbnail revealing black and white mask view
Hold Alt (Option on Mac) and click the mask thumbnail in the layers panel to see the mask itself in the canvas. What you’ll see is a black and white image showing exactly where you’ve painted. White areas are where the fill layer is active. Black areas are where it’s been hidden. This view is diagnostic. On complex composites, I use it constantly to catch soft edges, missed spots, or areas where the mask has gone gray when it should be pure black. When you’re done inspecting, Alt-click the thumbnail again to return to normal view.
Alt-click on mask thumbnail revealing black and white mask view
Hold Alt (Option on Mac) and click the mask thumbnail in the layers panel to see the mask itself in the canvas. What you’ll see is a black and white image showing exactly where you’ve painted. White areas are where the fill layer is active. Black areas are where it’s been hidden. This view is diagnostic. On complex composites, I use it constantly to catch soft edges, missed spots, or areas where the mask has gone gray when it should be pure black. When you’re done inspecting, Alt-click the thumbnail again to return to normal view.
Step 7: Apply the Same Logic to Adjustment Layers
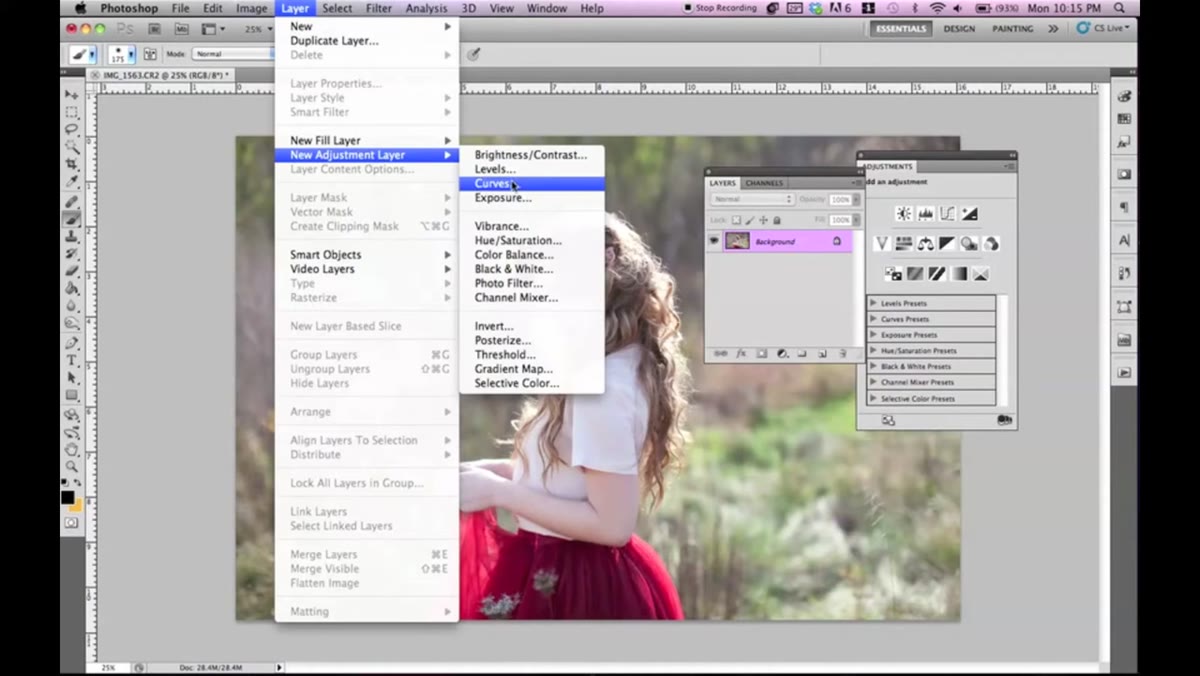 Curves adjustment layer added with mask, applied selectively to subject
Kobeissi closes the tutorial by showing that this exact workflow applies to any adjustment layer, using a Curves adjustment as her example. She builds a stylized color grade with the Curves panel, then uses the mask on that adjustment layer to limit the effect to one part of the image. The principle is identical: paint black where you don’t want the effect, leave white where you do. This is how working compositors handle color grading in complex scenes, keeping adjustments flexible and targeted without ever committing destructively.
Curves adjustment layer added with mask, applied selectively to subject
Kobeissi closes the tutorial by showing that this exact workflow applies to any adjustment layer, using a Curves adjustment as her example. She builds a stylized color grade with the Curves panel, then uses the mask on that adjustment layer to limit the effect to one part of the image. The principle is identical: paint black where you don’t want the effect, leave white where you do. This is how working compositors handle color grading in complex scenes, keeping adjustments flexible and targeted without ever committing destructively.
What I’d Add From My Own Work
The real power of layer masks compounds when you start combining them with selections before you paint. In my compositing work, I’ll use Select Subject or a quick pen path to generate a rough selection, then convert that selection into a mask. That gives me a head start on the hard edges around a subject before I refine with a brush. For hair and fine detail, I’ll sometimes run the mask through Select and Mask to pull in stray strands that a hand-painted mask would miss. The hand-painting Kobeissi demonstrates here is the core skill. The tools above it are just ways to speed up that same logic once the concept is solid.
One warning from experience: always name your masks. When a composite file has forty layers and each one has a mask, unnamed layers will waste your time. A two-second habit at creation saves ten minutes of archaeology later.
The single most important thing to take from this tutorial is the relationship between black, white, and visibility. Once that’s genuinely internalized, every other masking technique in Photoshop becomes a variation on the same idea. Gradient masks, luminosity masks, clipping masks. They’re all built on the same binary logic Kobeissi explains here in plain terms.
Watch the full tutorial on YouTube and follow along with your own image open. The hands-on repetition is what makes the logic stick.
Comments
Leave a Comment